GIMP Script-Fu: simple demonstration scripts (to be executed in batch mode from the command line)
The following simple examples try to demonstrate how it is possible to create an image with GIMPfrom scratch in batch mode, that is: in a console/shell.
Setting the background
The following script is probably one of the most simple one possible. It creates 250 pixel by 100 pixel image with a blue background and saves the image as jpg file into the directory f:\img:
(let* (
   (tq84_img (car (
         gimp-image-new
         250                         ; width
         100                         ; height
         RGB                         ; Image type (RGB, GRAY or INDEXED)
    )))

   (tq84_lyr (car (
         gimp-layer-new
         tq84_img
         250                         ; width
         100                         ; height
         RGB-IMAGE                   ; Layer type (RGB-IMAGE, RGBA-IMAGE, GRAY-IMAGE, GRAYA-IMAGE, INDEXED-IMAGE or INDEXEDA-IMAGE)
        "tq84"                       ; Name of the layer
         100                         ; Opacity (0 … 100, 0 = transparent, 100 = opaque)
         LAYER-MODE-NORMAL-LEGACY    ; Layer combination mode
    ))))

    (gimp-context-set-background     ; Set background color
       '(000 000 255)                ; blue
    )

    (gimp-drawable-fill              ; The purpose of gimp-drawable-fill is to fill a newly created
         tq84_lyr                    ; drawable before adding it to the image (Compare with gimp-edit-fill)
         FILL-BACKGROUND             ; Use current background color
    )

    (gimp-image-insert-layer
       tq84_img
       tq84_lyr
       0                             ; parent   (0 -> layer is added inside the main stack, outside of any group.)
       0                             ; position (location of the layer inside the stack, 0: top)
    )

    (gimp-file-save                  ; Invoke correct save handler according to file extension
         RUN-NONINTERACTIVE
         tq84_img
         tq84_lyr                    ; I don't understand why gimp-file-save requires a drawable - I just want to save an image.
        "f:\\img\\background.jpg"    ; File name
        ""                           ; File name as entered by user, apparently useless in scripts
    )

    (gimp-image-delete tq84_img)     ; Prevent memory leak
)

(gimp-quit TRUE)
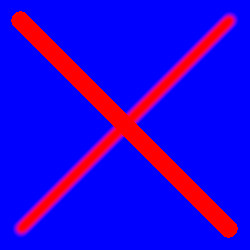
The following example draws two lines, one with gimp-pencil and once with gimp-paintbrush.
GIMP's user manual says the following about the difference between a pencil and a paintbrush:
The pencil and paintbrush are similar tools. The main difference between the two tools is that although both use the same type of brush, the pencil tool will not produce fuzzy edges, even with a very fuzzy brush. It does not even do anti-aliasing.
(let* (
     (img (car (gimp-image-new     250 250 RGB                                              )))
     (lyr (car (gimp-layer-new img 250 250 RGB-IMAGE "my layer" 100 LAYER-MODE-NORMAL-LEGACY)))
     (brs (car (gimp-brush-new "TQ84 Brush")))

     (coords (make-vector 4)) ; Array of 4 elements (to be set to doubles)
   )

   (gimp-context-set-background '(000 000 255))
   (gimp-context-set-foreground '(255 000 000))

   (gimp-drawable-fill          lyr FILL-BACKGROUND)
   (gimp-image-insert-layer img lyr 0 0)
 ;
 ;  Assign coordinates for first line to be drawn:
 ;
   (vector-set! coords 0  20.0) ; x1
   (vector-set! coords 1  20.0) ; y1
   (vector-set! coords 2 230.0) ; x2
   (vector-set! coords 3 230.0) ; y2

   (gimp-context-set-brush            brs   )
   (gimp-context-set-brush-size       19.0  )
   (gimp-context-set-brush-hardness    0.5  )
;  (gimp-context-set-brush-spacing    0.01  ) ; Is this sometimes necessary?

   (gimp-pencil lyr 4 coords)

 ;
 ;  Assign coordinates for second line to be drawn:
 ;
   (vector-set! coords 0 230.0) ; x1
   (vector-set! coords 1  20.0) ; y1
   (vector-set! coords 2  20.0) ; x2
   (vector-set! coords 3 230.0) ; y2

   (gimp-paintbrush lyr
         0              ; fade-out
         4              ; number of coordinates (not coordinate pairs)
         coords         ; strokes
         PAINT-CONSTANT ; method (PAINT-CONSTANT / PAINT-INCREMENTAL)
         0              ; gradient length
   )

   (gimp-file-save RUN-NONINTERACTIVE img lyr "f:\\img\\line.jpg" "")
   (gimp-brush-delete brs)
   (gimp-image-delete img)
)
(gimp-quit TRUE)
The line that goes from top left to bottom right is drawn with a pencil while the other one is drawn with a paintbrush. Imho, the difference of smoothness can be clearly seen:
Update 2020-03-08: as David C. notified me that the (gimp-context-set-brush (car (gimp-brush-new "non-existent brush"))) statement was needed on his GIMP installation (Ubuntu 19.10, GMIP version 2.10.8) for the example to work. Interestingly, on my Windows/GIMP 2.10.18 installation, the example worked without this statement.
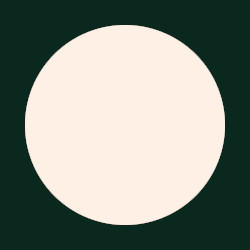
Filled circle
This snippet is basically the same as the previous circle. However, it uses gimp-drawable-edit-fill rather than gimp-drawable-edit-stroke-selection.
(let* (
     (img (car (gimp-image-new     250 250 RGB                                              )))
     (lyr (car (gimp-layer-new img 250 250 RGB-IMAGE "my layer" 100 LAYER-MODE-NORMAL-LEGACY)))
   )

   (gimp-context-set-background '( 10  40  30))
   (gimp-context-set-foreground '(255 240 230))

   (gimp-drawable-fill lyr FILL-BACKGROUND)

;  (gimp-image-add-layer img lyr 100)
   (gimp-image-insert-layer img lyr 0 0)

   (gimp-image-select-ellipse
          img                ;
          CHANNEL-OP-REPLACE ; operation (CHANNEL-OP-{ADD,SUBTRACT,REPLACE,INTERSECXT} )
           25  25            ; x and y coordinate of the upper-left  corner of the ellipse bounding box
          200 200            ; width and height of the ellipse
   )

   (gimp-drawable-edit-fill lyr FILL-FOREGROUND)

   (gimp-file-save RUN-NONINTERACTIVE img lyr "f:\\img\\filled-circle.jpg" ""             )
;  (gimp-xcf-save RUN-NONINTERACTIVE  img lyr "f:\\img\\filled-circle.xcf" "filled-circle")

   (gimp-image-delete img)
)
(gimp-quit TRUE)
(gimp-message …) writes messages, however with the prefix warning.
By default, these messages seem to go to a message box. This is of course less than desirable. Apparently, in order to redirect output to the console, the -s (or also -c?) command line argument must be used.
Alternatively, the message stream can also be redirected with (gimp-message-set-handler 1).
An example that demonstrates how multiple layers are merged into one image and then saved to a file. I once even asked a corresponding question on StackOverflow.